
When customizing neoprene products, you will need to select the right logo imprint method. This is crucial to achieve the desired look and durability for your logo and artwork. In this guide, we’ll explore various printing methods. After reading, you will know comprehensive information. We hope to help you make an informed decision for your artwork. Let’s start.
Screen Printing

Screen printing is a popular method for neoprene products. It offers vibrant colors including a pantone color. For one or two colors logo, we normally choose screen printing method. Screen printing can do 3, 4 and more colors as well. Just each color requires a individual mold. From a cost perspective, it may not be approprite.
This printing can break down into 4 steps.
- Printing Mold Preparation
After receiving the artwork of logo, we need send it to mold supplier. They will use it to make the printing mold on a screen mesh. It normally takes about 1 week to prepare. - First Piece Test
Before mass printing, operator will do a trial printing to make sure the color is matching the requirement. - Mass Printing
Operator places cutted fabric to the specified location. Operator pushes ink through the mesh screen onto the neoprene fabric surface. - Ink Dry
After printing, the ink needs to be dried. Either dryed in the air for about one day, or dried by oven for several hours.
Sublimation

Sublimation is the first choice for full-color designs printing of neoprene products. The process is transferring the ink from a specially printed paper to the neoprene fabric through heat and pressure. Sublimation is perfect for intricate and detailed logos. The color numbers increasing doesn’t increase the printing cost.
The printing can break down into 3 steps.
- Printed Paper Preparation
The artwork is printed on a special paper directly. - First Piece Test
Before mass printing, operator will do a trial printing to make sure the colors are correct. - Mass Printing
Before printing, operator need to pre-heat the sublimation machine for about 15 minutes. Then setup correct printing parameters (pressure and temperature). After that, operator places printed paper and cutted fabric together on the plate of sublimation machine. Close the press plate and click the heating button. After seconds, the artwork will be printed on the fabric. The printing process is done.
Heat Transfer

Heat Transfer printing involves transferring a design from a vinyl film to neoprene fabric. The printing process steps are similar as sublimation. They can use the same machine, but require different heat and pressure parameters. Vinyl adheres firmly to the material. The printing is resistant to wear and washing.
The vinyl allows very small and presize words and edges, such as washing label.

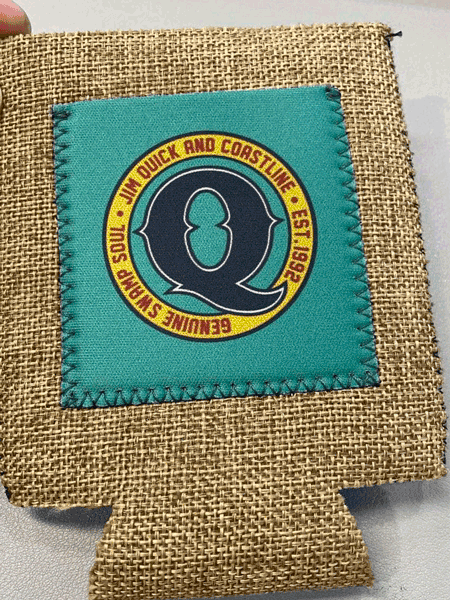
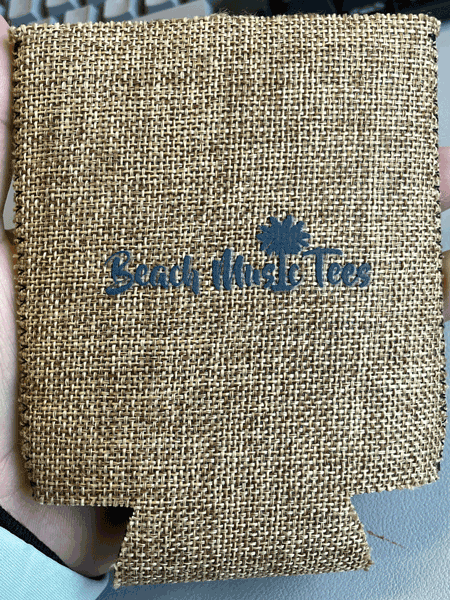
This is one of the biggest advantages. Also it can accept rougher surface than sublimation. Below left is an example of sublimation. And the right is done by heat transfer. You can see that sublimation can’t be applied on burlap fabric. However, heat transfer is good for such a rough surface.
Embroidery
This is one of the biggest advantages. Also it can accept rougher surface than sublimation. Below left is an example of sublimation. The right is vinyl heat transfer. You can see sublimation can’t be applied on burlap fabric. However, heat transfer is good for such a rough surface.

Conclusion
In summary, we need consider the following factors:
- Design Complexity: If your logo is intricate, sublimation or heat transfer may be more suitable.
- Color Requirements: For vibrant colors, consider screen printing, sublimation, or heat transfer.
- 3D Texture Preference: If you desire a textured finish, embroidery may be the best options.
In this post, we can only list out the most popular methods. There are more options available actually. We will always work with you closely for special projects.